2. Understanding Corbit
This section will give you a more in-depth understanding on how Corbit's individual parts work and how they all, when put together, will work as a powerful tool for your digital workflow.
Corbit is built with Workflows. A Workflow is a holder for the building components sources, filters and actions. These individual components are put together within the Workflow to work together. The three core components (source, filter and action) are explained in more detail below. The components can be re-used in different Workflows to make a complex workflow more understandable and simplify the maintainance. Each individual component (source, filter or action) executes it's own task within the framework of a Workflow. Without the Workflow the individual components can not work.
The core components are as stated unaware of other components. This feature gives the user possibilities to build very advanced workflows with little effort but it requires that the user know how the individual components work.
Reusable components - pros and cons
When setting up Corbit you will use these individual components (sources, filters and actions) many times and it is important for you to really understand the power but also the pitfalls that this model has.
By using these atomic pieces Corbit will become more dynamic in its setup and less setup is actually needed when a Workflow is built with single components compared to if a Workflow was one component on its own.
By reusing the single components less setup is needed but there is a huge pitfall that you must be aware of. NOTE! If you change a single component the changes will have effect on all places where this component exists. This is of course very useful when you like to change a single setting in many places but if you are not cautious this may lead to unwanted behavior in Corbit.
EExample: You create a filter which you name 'Jpeg images' and the filter is setup to look for files with name '*.jpg'. This filter is then used in many various Workflows in the setup. At a later stage you realize that in one Workflow you are not only interested in jpeg images but indeed images that are larger than 1 MB. The intuition says that you just open that filter and add a new restriction for this size but if you do this you have to remember that all the places where this filter is used will have the same changes.
This singular component feature is a very powerful feature but as seen above, be aware of its drawbacks when setting up big workflows.
2.1 Sources
A source is a component that will search for objects. The most common type of source is a folder on the local drive or on a mounted network drive. Other sources may for example be a folder on a remote FTP server, an email account on a remote email server or a database.
Corbit has four different built-in sources (see below).
Other sources such as database lookups, synchronization sources or other special sources may be developed as plugins to Corbit. For more information about an individual source type, see the configuration section.
Folder source
A folder source will look for objects in a folder on a local or remote network drive. The folder source is able to look down in a sub folder structure to detect objects in a sub level of the root folder.
Multifolder
The multifolder source is similar to the folder source. The difference is that the multifolder soruce may be set with a arbitrary number of folders. All these folders will share the same setup in terms of how often they will be scanned etc.
The multifolder source is also more efficient in terms of system resources compared to making single folder sources.
FTP source
The FTP source will use the FTP protocol to look for objects on a remote FTP server.
Email source
The email source is scanning an email server for emails. Special email filters will apply to such a source.
Timer source
The timer source is a special type of source which is not actually looking for any files, folders or emails. This source will work as a alarm clock. When the alarm goes off this source will notify the Workflow and the Workflow may perform special tasks which do not require any objects to execute action upon. This may for example be used to send a daily report at a given time.
Note that the special timer filter is required for useful operations when using this timer source.
Extensis Portfolio source
The Extensis Portfolio source is only available for the Corbit version integrated with Extensis Portfolio.
2.2 Filters
A filter is a component responsible for filtering the objects registered in a source. Different kind of objects may therefore be handled differently.
There are five built-in filter types in Corbit, some of which will work with any kind of source and some are useful only on some sources. More advanced filters may be developed as plug-ins.
For more detailed coverage of the different filters, see the configuration section.
Email filter
The email filter will apply to emails from an email source. Note that individual files will not be handled separately. The email will be treated as one object and handled as one. Do not use this filter if you wish to execute actions on attachments in an email. The actions following this filter will only have the actual email in scope (email body, sender etc) when they execute. This may be useful if you like to save text files with the email content.
If you like to execute actions on attachments you should use the file filter instead.
File filter
The file filter is filtering regular files, located locally or remotely on FTP or email servers.
Using this filter you may set restrictions such as file name, file size, certain internal properties on images, PDF files or MP3 files and more.
Folder filter
Similar to the file filter but this filter will only handle folders.
Misc
The miscellaneous filter may be used to filter any kind of item. Compared to for example a file filter, which only handles files, the misc filter does not filter based on the handled object type.
Timer filter
This filter is a special filter which is needed if the Workflow is holding a timer source. This filter is not a regular filter in terms of restrictions. A file filter may for example have a restriction to only let files with file suffix 'jpg' go through the filter. The timer filter will not have any restrictions but will only be passed if the source is a timer source that fires.
2.3 Actions
The actions are the components in Corbit which will invoke a special handling upon an object, e.g. moving a file. Many different kinds of actions are shipped with Corbit. Other actions such as advanced database handling may be developed as plugins.
For more detailed information about each individual action, see the configuration section.
Error handling action
The three main component types; source, filter and actions, are put together in a Workflow. The sources and actions may, depending on their types, experience problems when they are working, e.g. a folder source might not find the root folder or a FTP action may not be able to connect to the FTP server. When such an error occur the user may setup special actions for these events. These special actions are called error handling actions.
2.4 How to setup a workflow
All configuration regarding workflows in Corbit are collected under the workflow node in the main window of Corbit. Here you can see all the Workflows configured, and configure new workflows. When hovering over the workflows you will get the option to Start/Stop Workflow, Edit or Delete. You can also double-click on a workflow to open up for editing or viewing.
The top menu here is not columns, this is the sort order to let the user sort the workflows in any order they like. Click on the one you want to use. If you want to have a closer sorting, press Shift and click the next value you want to use for sorting. In the example below we have used Active first, then Name and then Queue.
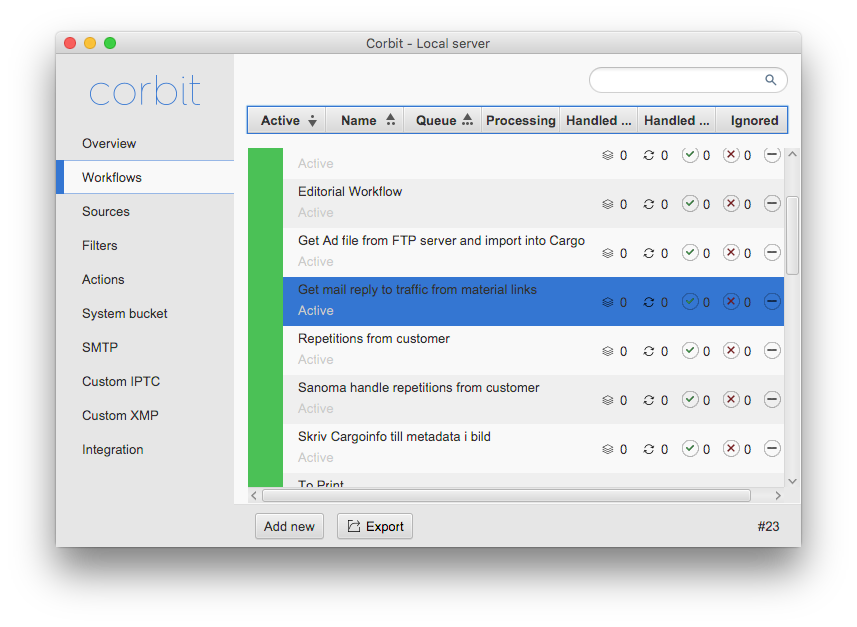
The Workflow's individual components are seen in the component tab.
Workflow overview window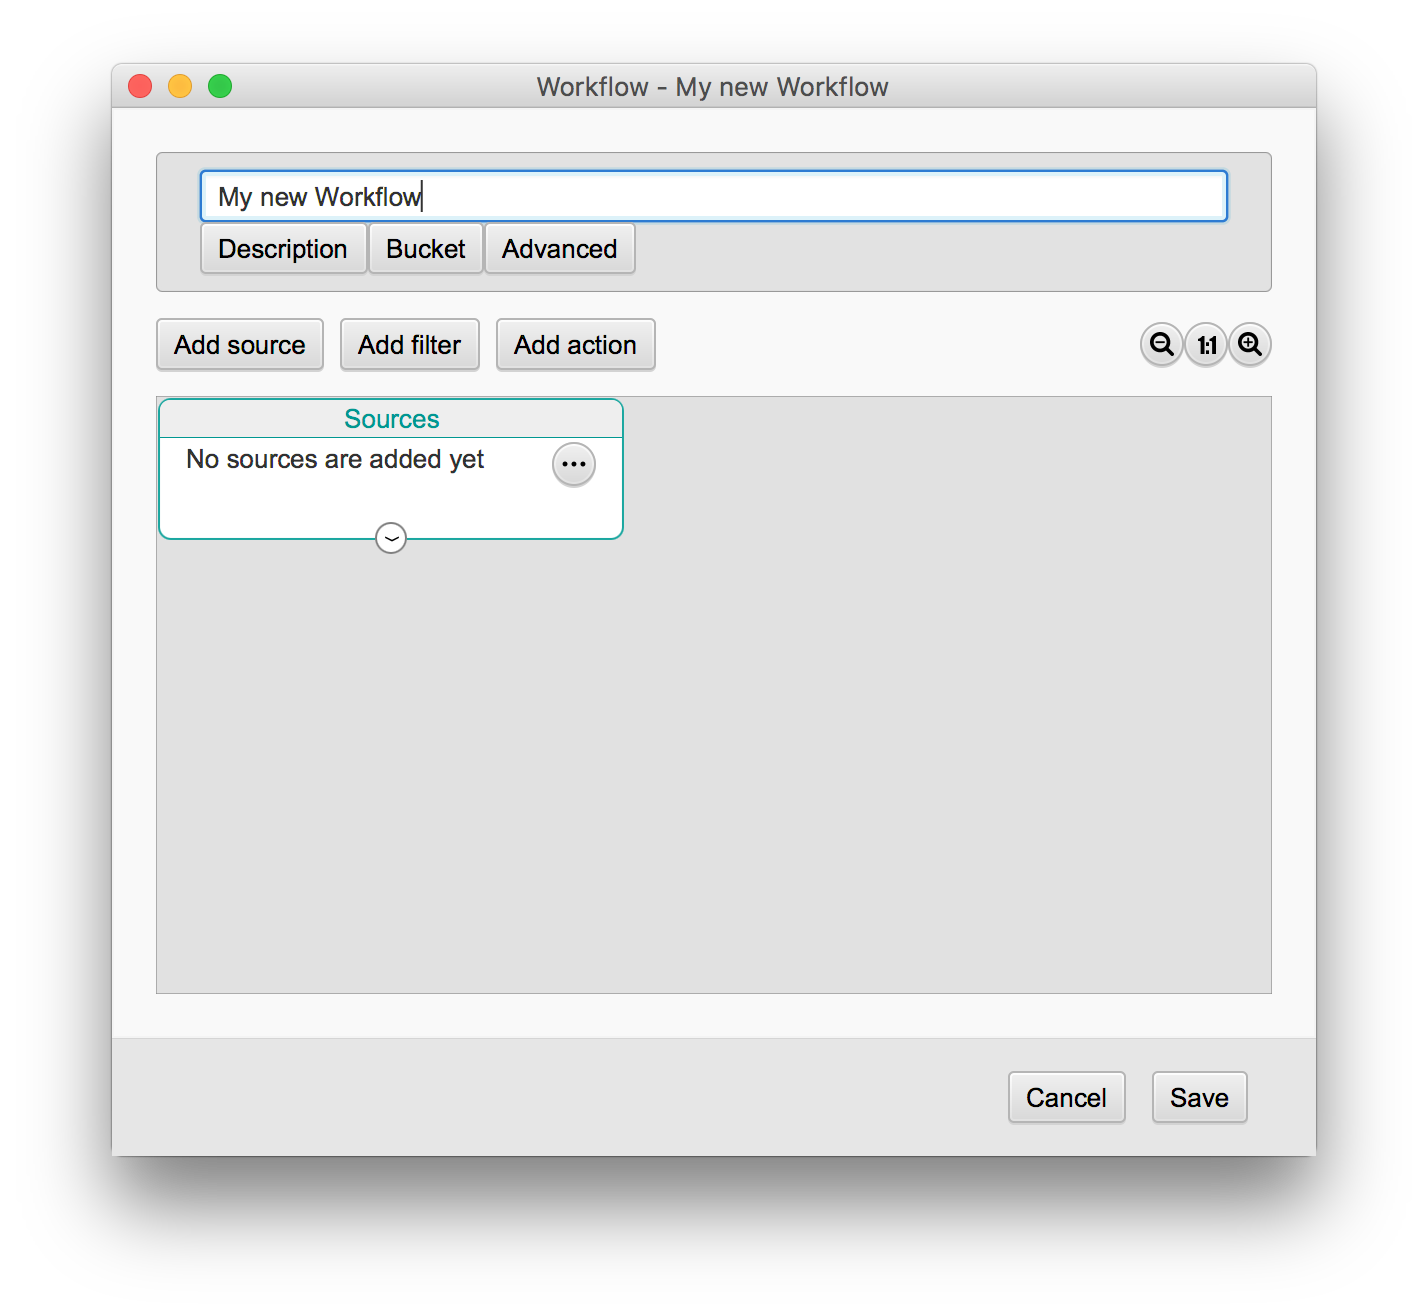
The Workflow's individual components are seen in the component tab.
Workflow setup windowIn the bottom of the dialog you have the option to Export the selected workflow. More information on this under the headline Export and import of a Workflow. Give your workflow a name in the top, click Description to enter a description of this workflow. If you are using Buckets (more information in the last paragraph of 2.4) you can add them here (use the + button) and under Advanced you may enter a few values (more information in the last paragraph of 2.4).
Edit or double-click opens up the graphical interface for setting up your workflow. You start your workflow by adding a Source. Select the source you want to use from the list you get when hitting the button with 3 dots and hit the + button on the left of the source name.
You can have more than one source in your workflow.
Add a Filter using the button Add filter. NOTE! You must always use a filter in your workflows. If you want all files to pass, use the filter All files. You may also use more than one filter in your workflow.
Then add your Actions (there can be several in a workflow). Use the connectors to set the order of the actions. Be careful when setting up these actions so you don´t get the wrong order.
Use the connectors to set up the order of the workflow, see image below. By clicking the arrow icon in the bottom of the Source you will get a “tube” that you can drag to the input connector of the Filter (see below). The upper connector (input arrow icon) is the one you should connect to. There is a lower connector on the filter, just below the input connector. This one can be used if you want the files to always continue in a workflow, regardless of if it matches the filter criteria or not. This is only an option, it can be very useful in some cases. On the right side of the Filter, there is a green connector which indicates this is where you add the rest of your workflow IF the file has matched the criteria of the filter. The red connector in the bottom of the Filter is for errors. Continue adding Actions as you like using the same method.
Messed up the layout of the workflow? Right-click somewhere in the workflow and choose Reset layout. This will bring some order back to the workflow.
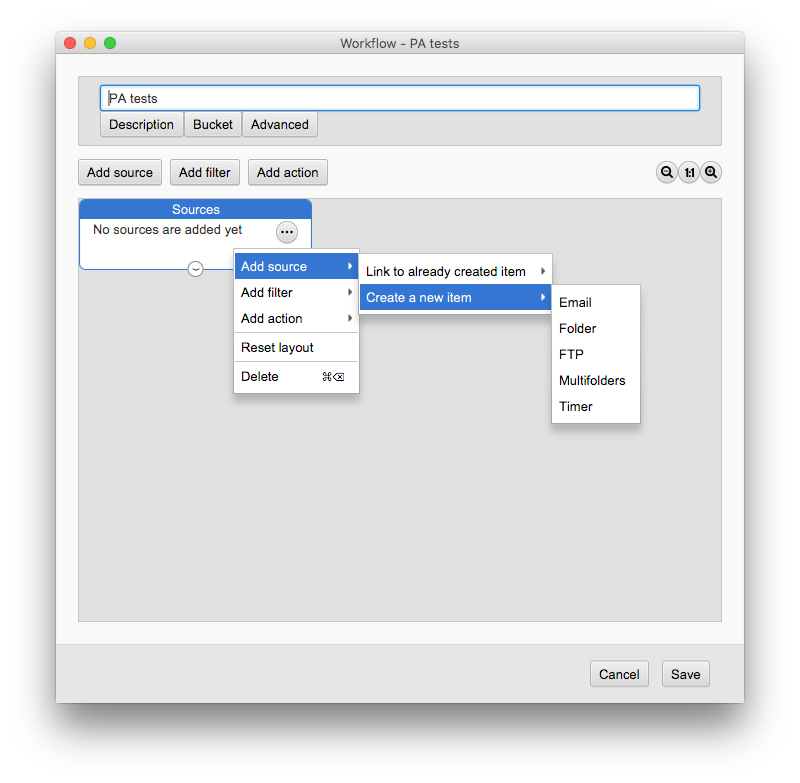
There is always an option to right-click when you are working with your workflows.
Right-click optionUsing the right-click option you can both create new filters and actions or choose to use existing ones.
Zoom
If you create large workflows, it can become a challenge to get an overview of the different parts of the workflow. There are zooming available using the buttons in the top right corner (-,1:1,+)
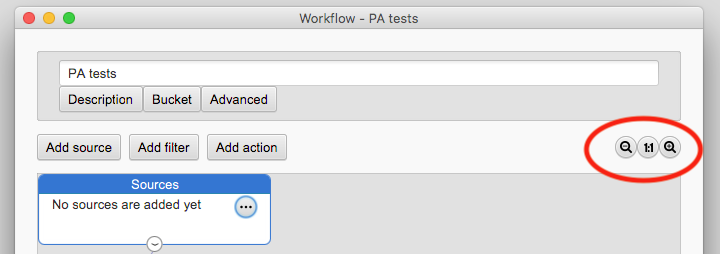
There is always an option to right-click when you are working with your workflows.
Zoom optionSources, Filters, Actions
All three works exactly the same. You see a list of existing sources/filters/actions and you can edit/delete from the list. Add new in the bottom of the dialogue is used to create new ones. NOTE! Sources, Filters, Actions are all global values which can be used over and over again.
If you edit any of the globally set values of source, filter or action, the changes you make will affect all workflows where this source, filter or action exists. If you only want to change it for one workflow, duplicate the source, filter, action in the global list and create your changes in this new version.
Note
The individual order of the filters is very important.
If an object being filtered is passing a filter, that particular filter's actions are invoked. If the object remains at the same location after the actions the object is continued in the next filter and may thus be handled by actions in many different filters.
The action order is also very important since the actions are invoked in order. If one action for example is moving the object to a new location the rest of the actions are not going to handle the object since it has been removed.
Use the connectors in in the workflow editor to change the order of the filters and actions.
Workflow setup dialog, advanced button
Activate on start will set this workflow to start scanning for jobs as soon as Corbit is started. If not activated you start the workflow in the Workflow window manually.
Use cache means that Corbit will build a cache for this workflow in order not to handle the same file more than once. This is very useful if you are scanning a folder for files but you can´t delete them or move them because there are other software solutions using the same files.
The max concurrent handling is default set to one (1). This is the number of objects that may be handled in parallel in this Workflow. If you for example use a source that detects 100 files in one scan, each file is handled separately in the Workflow and only one file is handled at a time. If you change the concurrent handling to for example 5, 5 files will be handled at the same time.
Be careful when changing this number. If you set a high number of concurrent handling the CPU usage will increase and the handling may in fact get slower if this number is too high and the sources/actions uses a lot of network communication such as FTP server connection.
Suspension will occur when an action in this Workflow fails its handling. The object that are being handled are being put to suspension for the specified suspension timeout. When this occurs the next object in the queue will be handled in the Workflow. When the suspension time is over the object is being handled again but actions that have already been invoked on the object will not be executed again. An object will be suspended and the action will try to handle the object over and over again. If you like to have a maximum number of suspensions before the object will be handled different (for example you may want to move the object after 10 failures to another folder) you may specify the number in this advanced setup.
2.5 Workflow, object and system buckets
The bucket is a holder for keys and values and may be very useful if its capabilities are fully understood.
There are three different buckets. Each Workflow has their own global bucket where the values are kept even if Corbit is stopped. There is also a temporary bucket which is created for each object that is handled. Finally there is System buckets.
Object bucket
The object bucket feature is very powerful and may for example be useful when one action wants to use information from another action.
An object's bucket lifetime starts when an object is detected in a source and started to be handled by a Workflow and ends when all the actions have been executed. This means that for each object that is handled in a Workflow a new bucket is created. The bucket's data is shared among the actions which are invoked on the object. Values that are put into the bucket can be used by any action that is performed after the value is put into the bucket.
A common way to get values from this bucket is with the macro %BUCKET[...]% (see the macro section for more details). Filters may also filter on a bucket value and there is also a special action to set the values for a bucket.
Before an object is being handled by the actions the Workflow itself puts some core information into the bucket. Information about these is found in the table below;
Common bucket values
set by all Workflows
| Bucket key |
Value description |
| source.email |
If the object being handled is an email the value contains the data about this email. More information for developers can be found in the plug-in API. |
| source.file |
If the object being handled is a file the value contains a reference to this file. More information for developers can be found in the plug-in API. |
| source.exif.<file path> |
If the object being handled contains exif information, this bucket value contains that data.
Note that all data is loaded lazily, see the bucket key exifLoaded. |
| exifLoaded.<file path> |
A boolean value to see if the exif data has been loaded or not. |
| source.imageData.<file path> |
If the object being handled contains iamge information, this bucket value contains that data.
Note that all data is loaded lazily, see the bucket key imageDataLoaded. |
| imageDataLoaded.<file path> |
A boolean value to see if the image datahas been loaded or not. |
| source.iptc.<file path> |
If the object being handled contains IPTC information, this bucket value contains the IPTC data.
Note that all data is loaded lazily, see the bucket key iptcLoaded. |
| iptcLoaded.<file path> |
A boolean value to see if the iptc has been loaded or not. |
| source.mp3.<file path> |
If the object being handled contains MP3 tags, this bucket value contains that data.
Note that all data is loaded lazily, see the bucket key mp3Loaded. |
| mp3Loaded.<file path> |
A boolean value to see if the mp3 data has been loaded or not. |
| source.xmp.<file path> |
If the object being handled contains XMP information, this bucket value contains that data.
Note that all data is loaded lazily, see the bucket key xmpLoaded. |
| xmpLoaded.<file path> |
A boolean value to see if the XMP has been loaded or not. |
| sourceFileName |
If the currently handled object is a regular file the value will be the name of this file. Normally this is accessible through the macro %F%%E% but some actions may for example work on external files where %F% will refer to this external file name and thus getting the source file name is easily done using this bucket key. |
| sourceFilePath |
If the currently handled object is a regular file the value will be the path to this file (excluding the file name). |
Workflow bucket
As an addition to the object bucket Corbit uses Workflow buckets. This Workflow bucket is a more static bucket where the values will be saved with the Workflow even if Corbit is shut down. This Workflow bucket may be used for example to have a running number or an internal log .
The Workflow bucket may be seen in the setup of a Workflow, see image below.
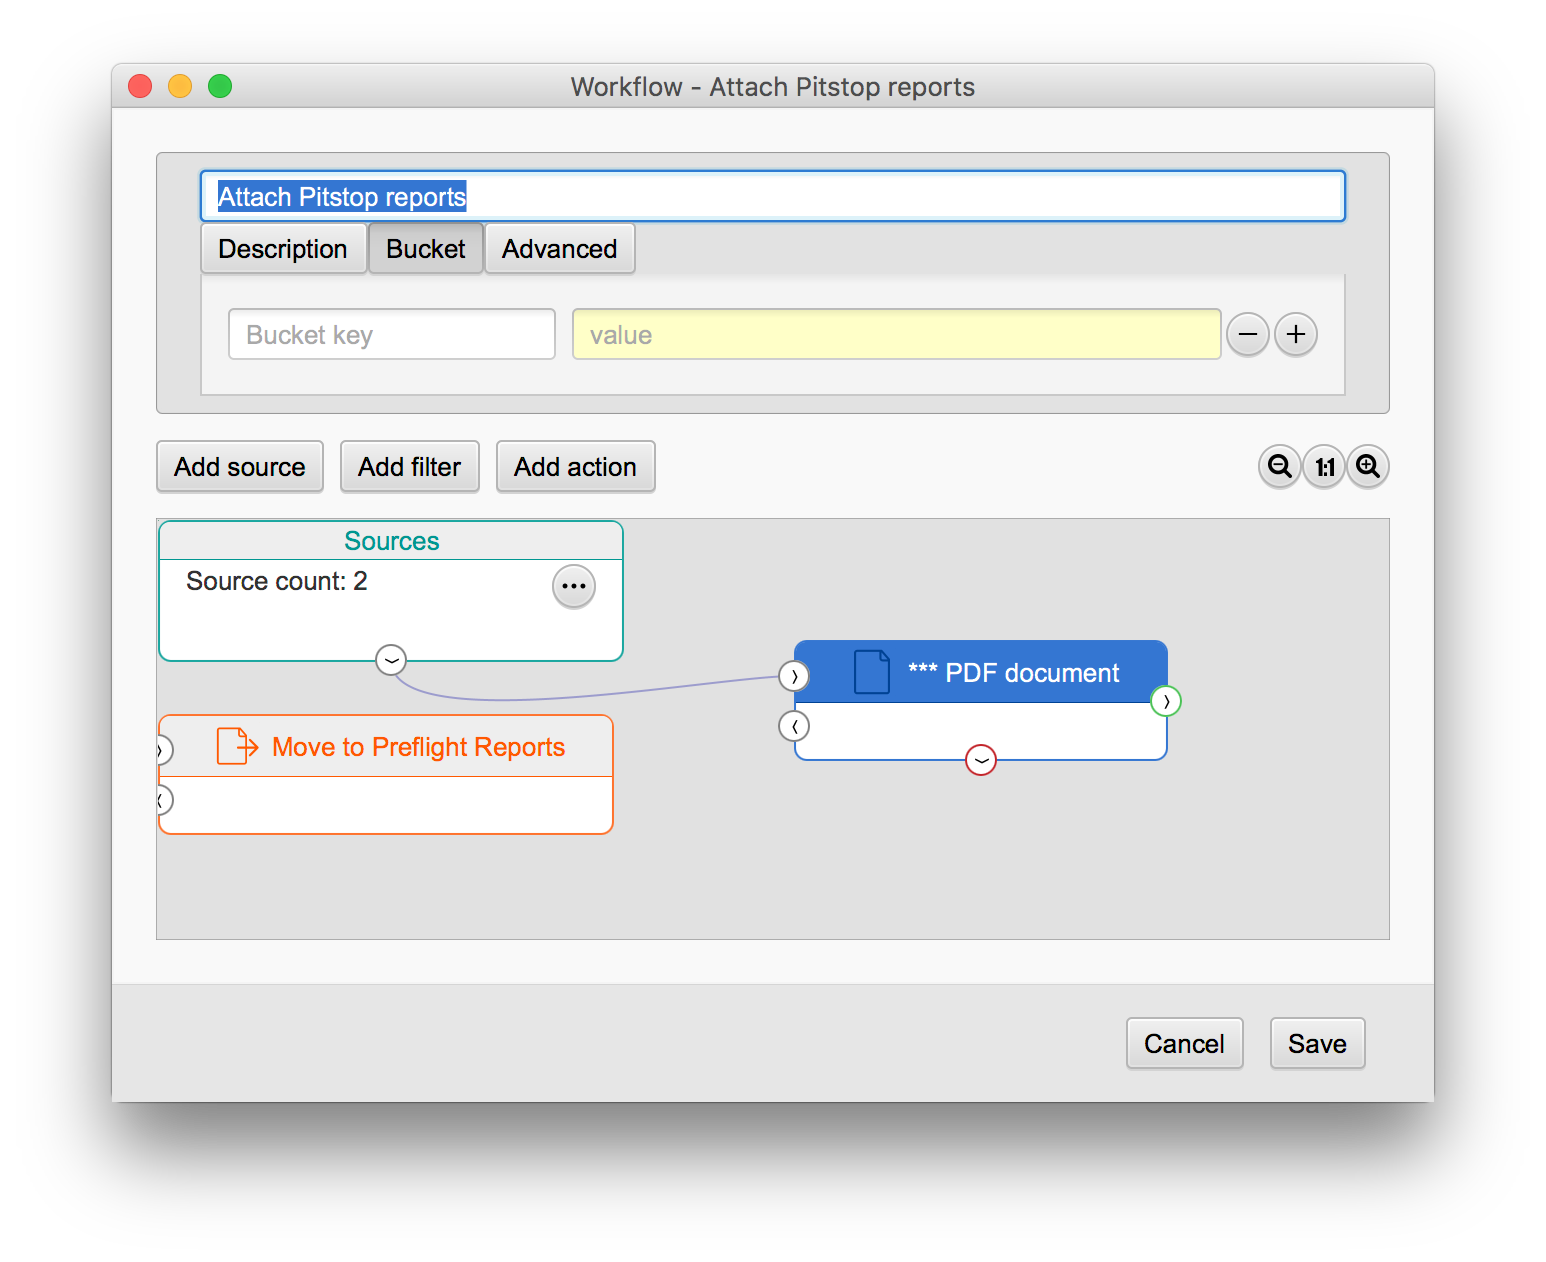
The bucket tab in the Workflow setup dialog. Here you can see the current values of each bucket key in this Workflow.
Workflow setup dialog, bucket setupA common way to get values from this bucket is with the macro %WORKFLOW_BUCKET[...]% (see the macro section for more details). Filters may also filter on this bucket value and there is also a special action to set the values for the bucket.
Example with running number
If you like to have a running number which may for example be used to rename fiels passing a Workflow you may use a combination of an external text file and macros reading this text file and writing new values to this text file. With the use of a Workflow bucket this is now a much more simplier task.
You start with creating a new Workflow bucket key. This is done in the bucket tab in the workflow setup dialog. We may for example create a new bucket item with key Number and let's assume we give it an initial value of 1.
If we want all files that are detected in this Workflow to be moved to a server location with this number attached we simply create a move action and in the name change field we can use the following text (to append a dash and the number)
%F%-%WORKFLOW_BUCKET[Number]%%E%
If we now want the number to increment for each file we will need to add an action after the move action which will be of type bucket. This action may set a bucket value. The key will be Number and the value will be the following (to add 1 to the number)
%MATH[+,1,%WORKFLOW_BUCKET[Number]%,0]%
Using the two actions described above each file will get their own unique number. If the Workflow is edited you can always in the bucket tab see the current value for the key Number (and you may also manually edit the value.)
For more advanced setups you may want to use a special timer source and filter in this Workflow to reset the Number for example each hour or day.
System bucket
These buckets are set in a separate menu since these buckets can be used by any workflow. System buckets are similar to Workflow buckets but may be shared between workflows.
Examples of system bucket use may for example be to set a server location or a server host name. This server location/name may then be used in multiple sources or actions. If the server is changed the change will only be necessary to do in one location, the system bucket value.
2.6 Workflow cache and internal state
Each Workflow has a very advanced internal cache system. This cache feature is used to prevent Corbit to handle objects several times. The cache system will use resources and should be avoided when possible. The cache system consists of two parts, a cache and an internal state.
The internal state is a memory where the Workflow will remember which actions have been executed on each object. The cache is a memory where the Workflow will remember if an object has been handled or not. If you have a Workflow where objects in the source location will be moved or deleted from the source location when Corbit handles the objects you do not need to use any cache.
Example with cache
Imagine a Workflow where all files will be handled and you have three actions.
The first action is copying the file to a server (server A), the second action is sending the file to a FTP server (server B) and the third is moving the file to another file server (server C).
A file is detected in the source folder and the Workflow starts to handle the file. The first action copies the file successfully, the second action fails sending the file to the FTP and the Workflow will therefor stop the handling and put the file on suspension. When the suspension is over the Workflow starts the handling again.
If the Workflow is set to remember the internal state, the Workflow will not perform the first action again since that action is already executed. The Workflow will start with the second action. If the Workflow is not using internal state the first action will be executed each time.
In an environment where Corbit is scanning a source location where the objects will not be moved or deleted you will need to use the cache to avoid that Corbit handles the objects over and over again.
Each object in a source location is compared with the Workflow's internal cache before it is handled. If the object name is the same but the modification time is changed, the object is handled as a new object in Corbit. The object is also handled as new if the object size is changed.
Workflow recommendation
We strongly recommend not to use Corbit scanning source locations where you have a lot of objects and the objects will not be moved or deleted. This will cause Corbit to keep a large cache and each object will be compared to this cache before handling may be started. If the source location contains a large number of objects this may cause Corbit to be slower.
To avoid this, we recommend that Corbit will be handling the objects before they are placed to the static storage.
2.7 Export and Import of Workflows
To be able to have a better import feature for the end customers, a new feature to create a better help for the importer (e.g. the end customer) is developed. This feature will become handy for consultants setting up workflows locally and wanting to send them to one or more customers. It can also be used if we decide to have a web page where customers can download pre-made workflows.
Some settings are always local and specific, for example the paths to folders, and can´t be set as a general setting. Another example may be user information and passwords for e-mail servers or FTP-servers.
Start creating this import guide by choosing the workflow you would like to export by selecting in your list of workflows. Then hit the Export button (disabled if no workflow is selected).
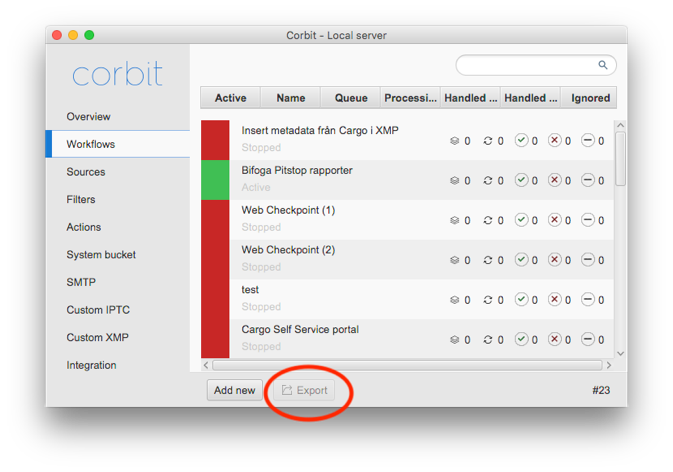
Export button (disabled if no workflow is selected).
Workflow Export
To create a new import guide, choose "Edit import guide".
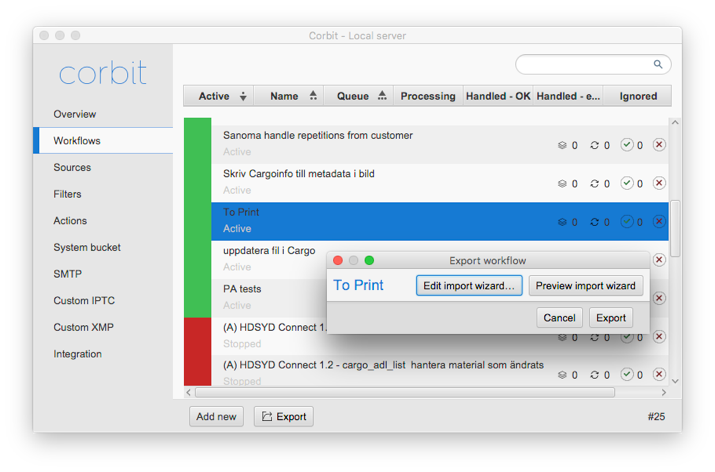 Create import guide
When entering the interface for the import guide, you normally would start with choosing the layout of your guide which is what the person importing this workflow will see.
In the upper right corner, the red circle, is Grid and Text. Drag and drop the object you want to use into the layout area (in this case a Grid).
You can use multiple pages for your layout if you like, see upper left corner where you can add pages with the + button and then move between the pages which are shown as tabs.
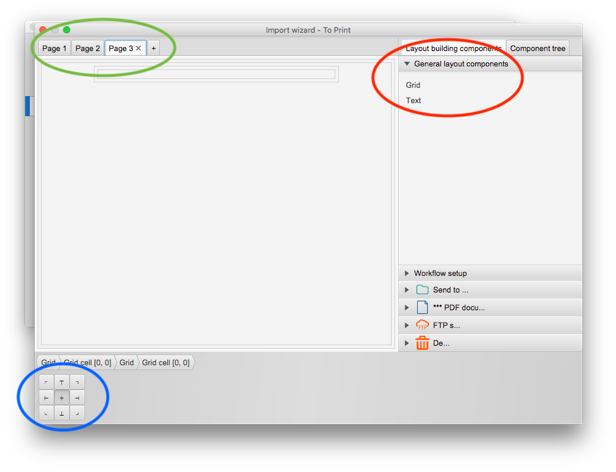
Edit import guide interface
Import guide interface
When an object is in the layout area, you can define its place using the placement controls in the lower left corner.
For a grid, you can set this up in several different ways. This is because you may want to this a little different depending on the nature of the workflow and what features this workflow holds.
Select the grid and you will see some settings appear in the left bottom field. Here you decide the size, number of columns, column and row space. In the example below we have changed the default grid value to 2 x 2 which will give you a feeling of a table where you can add components in every grid.
NOTE! As you can see below, there are two grids available in the tabs. This is because there is always a surrounding grid in the layout area.
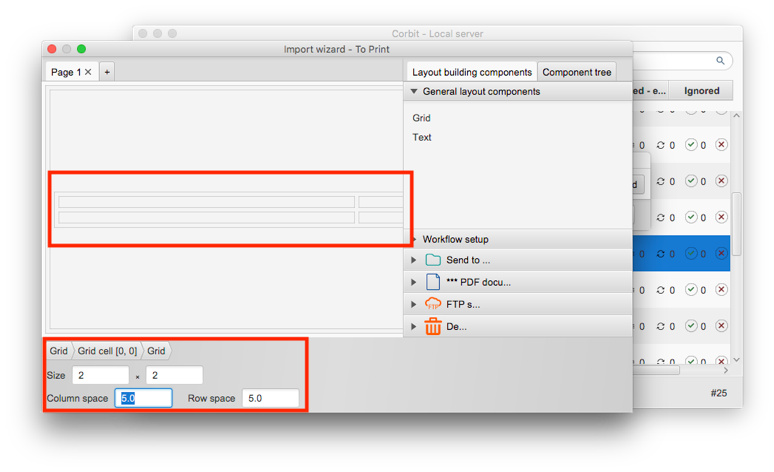 grid value
Example of a full export and import workflow
Start by choosing the workflow you like to export. Select it in the list of workflows and hit the Export button. Choose Edit import wizard…
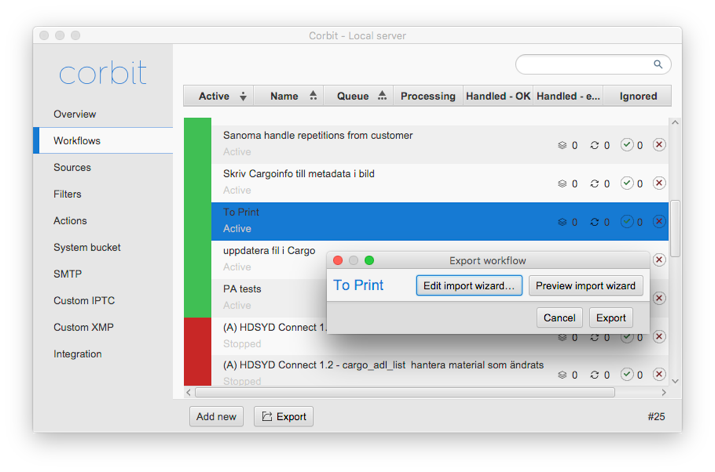 Image
Image
Create a grid and drag and drop the objects that the person who will import this workflow may need to change, e.g. objects with paths / ftp-addresses / e-mail address etc.
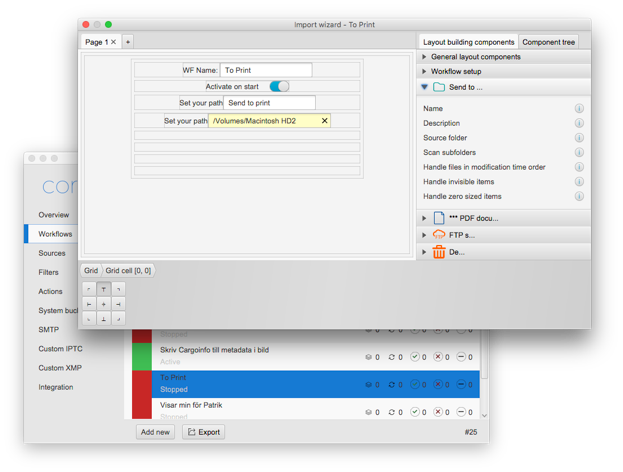 Image
Image
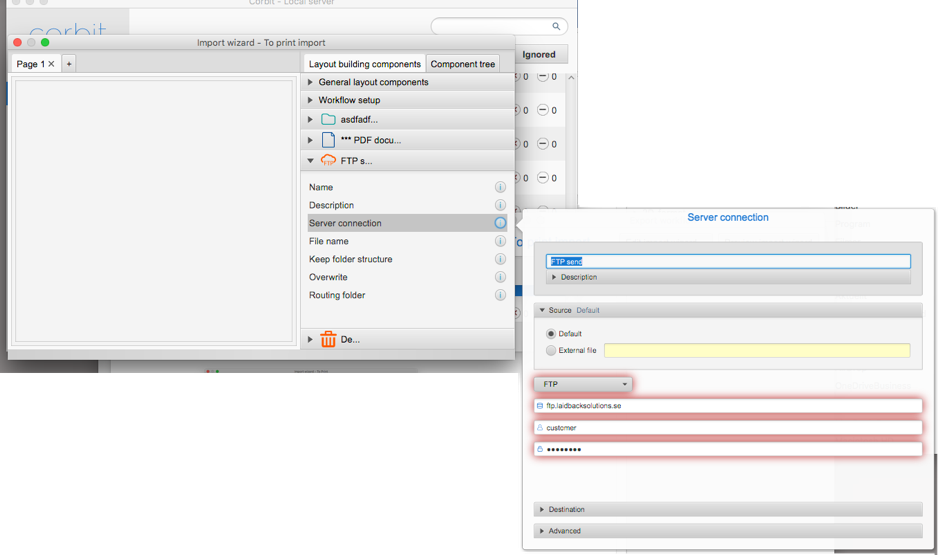
If you are unsure of which fields that holds this kind of information, there is a button at the far right of every single object with an i for information.
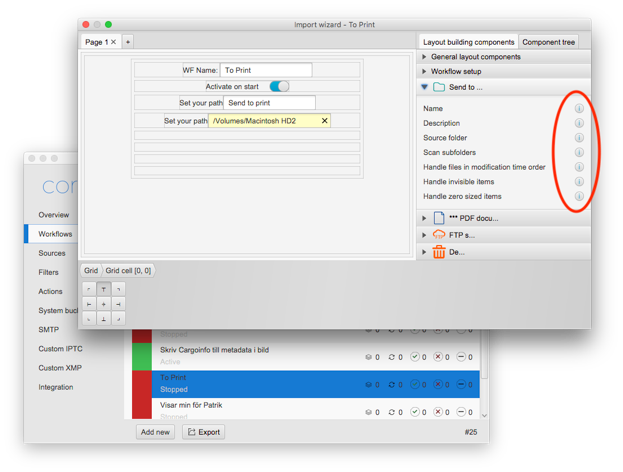 Image
Image
Press this button and keep the mouse button down to preview the object.
 Image
Image
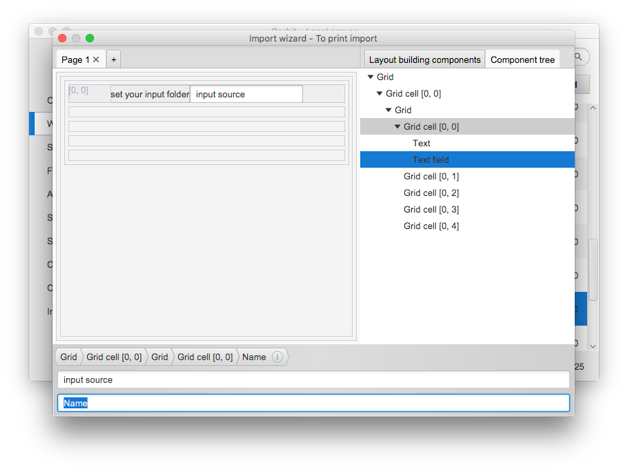
All components of your guide are also available as a tree. Choose Component tree if you prefer this way to see your objects.
 Image
Image
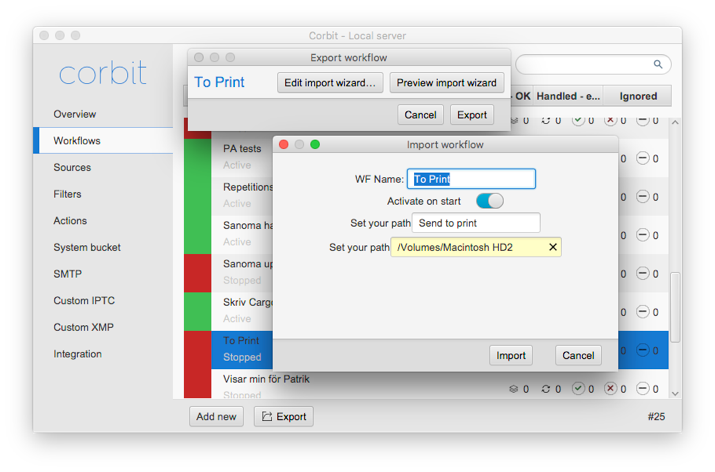
When you are ready with setting up the guide, use the standard red button in the upper left of the window to close the guide. This will show the Export workflow dialog again. Choose Preview import wizard to check out what you have done. A preview of the guide will be shown.
 Image
Image
If you are happy with your work, close the preview window and choose Export and save where to save the workflow. This workflow is now represented in an XML-file with the name of your choise.
Import a workflow
Select the workflow file you want to import, the XML-file we created in the guide.
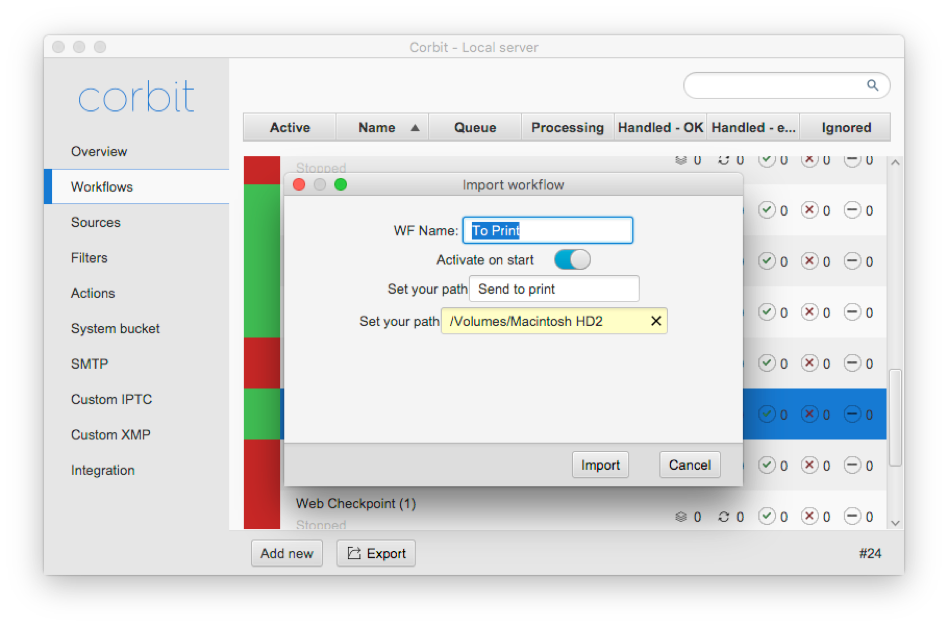
Drag and drop that XML-file on top of the Workflows list and this list will show “Drop file to import”. Drop it and your guide will be shown.
 Image
Image
The person importing this station is now able to edit the fields you have chosen when creating the guide. When done, hit the Import-button and you are done.
This guide will make it easier for the importer of a workflow.
But you don´t need to create a guide, you can just hit Export when exporting a workflow. If the importer need to change anything in the workflow, he can still do that but this time by opening the configuration of the workflow. This is a little harder and it is easy to miss an object that needs change, that´s why we created the option to create this guide.
2.8 Macro
Throughout all the setup of Corbit you will find fields which are yellow instead of white. These fields are macro fields and may contain special macro text. The macro text is special dynamic text. The macro concept is explained in more detail in the macro section. The macro text enables you to setup Corbit to very advanced workflows.
2.9 Troubleshooting
Symptom
Corbit starts in demo mode even though I have entered my license key.
Corbit shows error that preferences can not be written.
Corbit acts strange and is slow (mainly Corbit version 6.0.15 and earlier)
Cause
All the above symptoms may be related to lack of write permissions on some folders where Corbit writes information.
Solution
Change the user permission on the following folders. The user that is running Corbit must have write permission in the folder(s).
On Macintosh the following folders should have write permission:
/Library/Application Support
/Library/Preferences
<User>/Library/Preferences
<User>/Library/Caches
On Windows platform the following folders should have write permission:
<Corbit installation folder>
2.10 Error handling
Introduction
The error handling in Corbit is an extensive feature available from Corbit 8.0.
Each workflow has its own setup for the error handling which is integrated in the workflow
map. There are two main parts in the error handling;
• The workflow has a common error handling that applies to all components
• Each individual component has its own error handling
The error handling may contain all types of filters and actions that a regular workflow.
Note
that when handling is performed by a filter or action during error handling, any error that
occurs will be silently ignored,
e.g. if the error handling includes a move action and the root
folder is not found, this will not cause a new error handling but will be ignored without any
notifications.
Suspension
One important step in the error handling is the suspension. When an error occurs and the
possible error handling is done, the object may go to a suspension state.
This will cease the
regular handling and cause the handled item to pause. The workflow has a setting which
specify how long the pause will be until the item is ready to be handled again.
The item will
start the handling from the spot where the previous error occurred.
Error handling setup
The error handling is visually setup in the Corbit client.
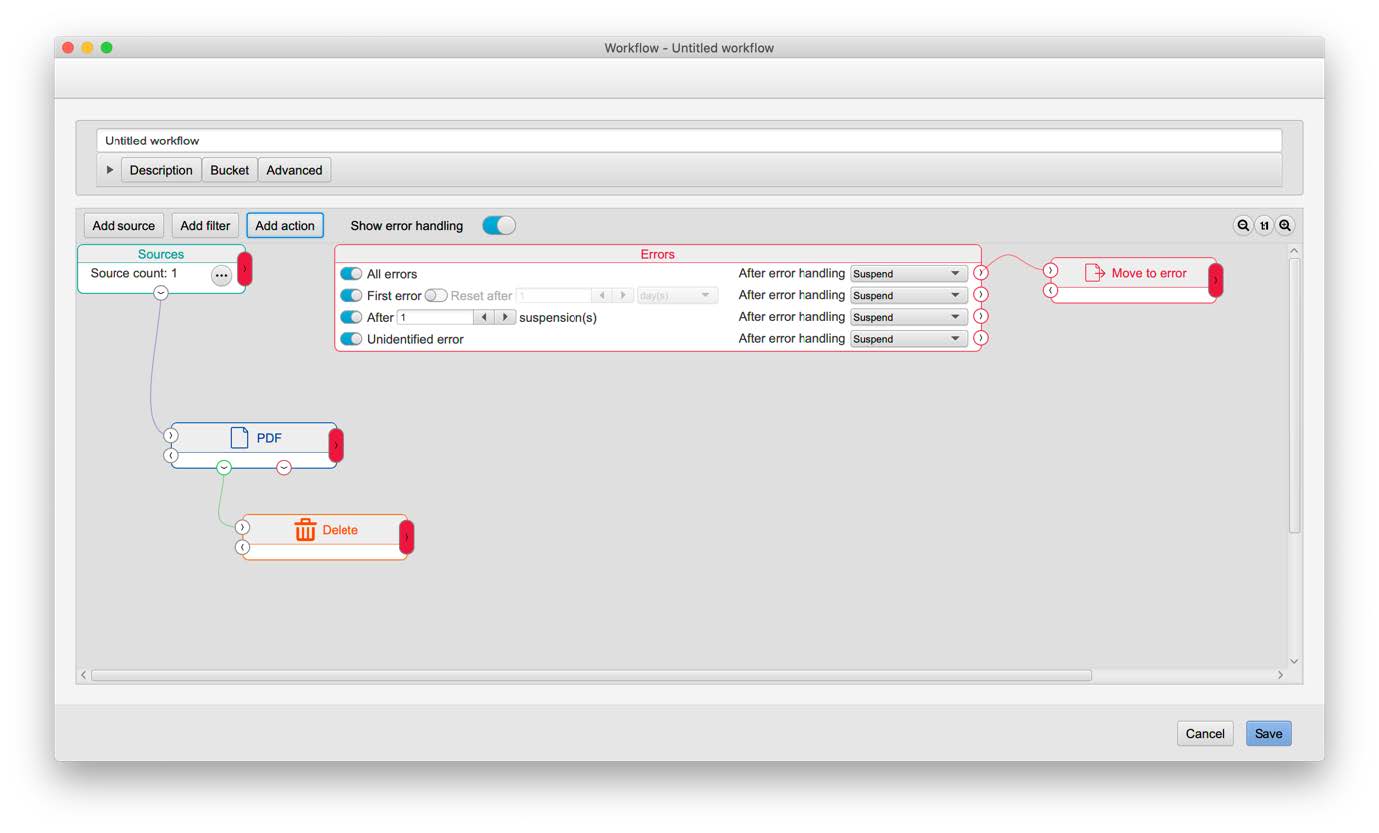
Workflow with common error handling
Workflow with common error handlingThe error handling may contain filters and actions and it is setup in the same way regular
components are used in the workflow.
Note that there is no restriction what to connect to the error handling. Parts of the regular
workflow map may therefor also be invoked in the error handling.
Components that are part of the error handling are shown with red borders and connectors
that are red indicates that they are used in error handling. If a component is both part of an
error handling as well as the regular workflow it will be shown with its regular colour.
The error handling components may be hidden in the workflow setup by using the toggle
above the workflow map. Hiding the error handling is only a visible state in the client user
interface, the error handling will still be active on the server side.
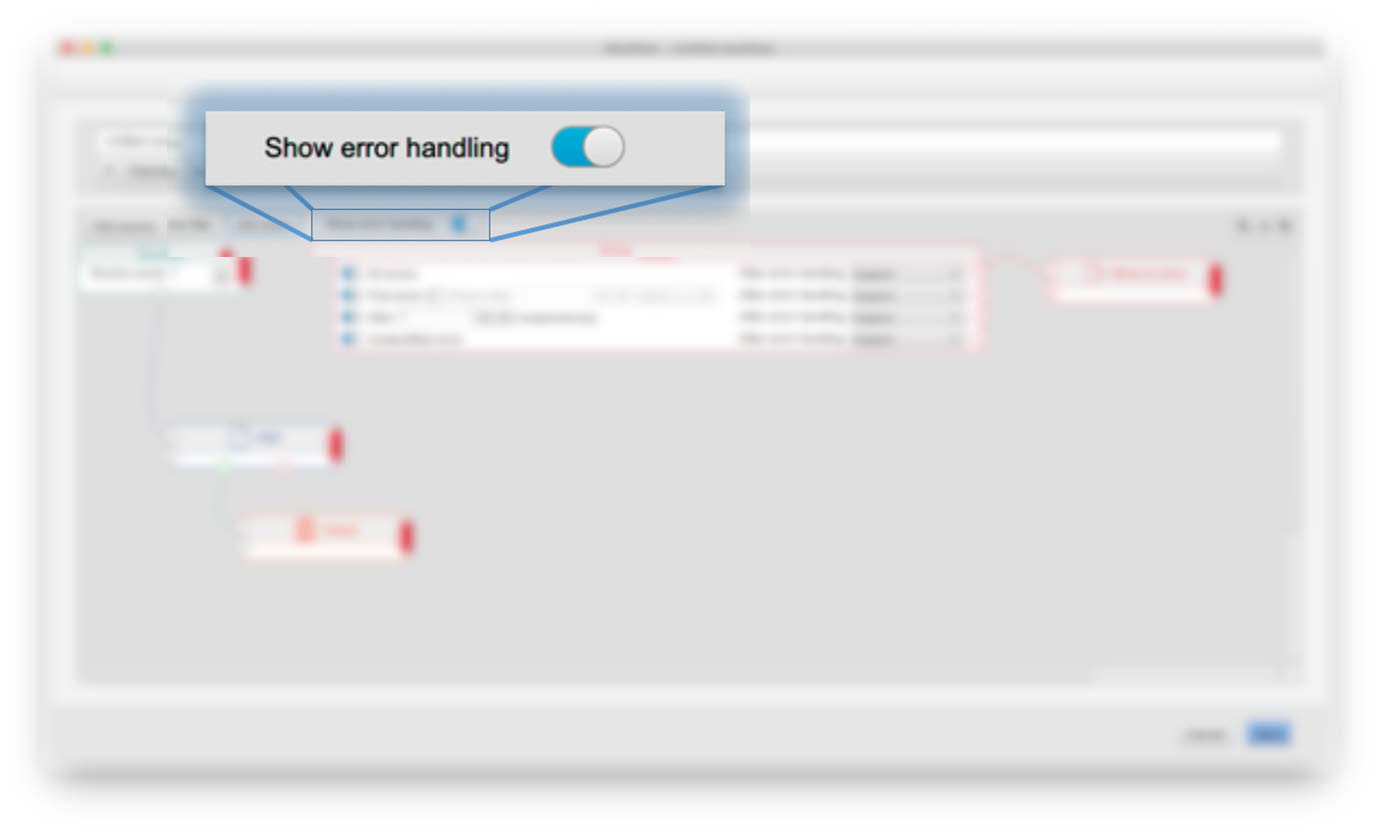
Toggle to show/hide the error handling
Toggle to show/hide the error handlingEach individual component in the workflow that may have an error is indicated with a red
box on the right side of the component. When the error container is clicked it will expand to
show all the errors that may occur in that particular component. The expanded error
handling view may be clicked to be minimized.
Note that the link from a specific error handling may be connected to the same workflow as
another error link, giving the same workflow for two different errors.
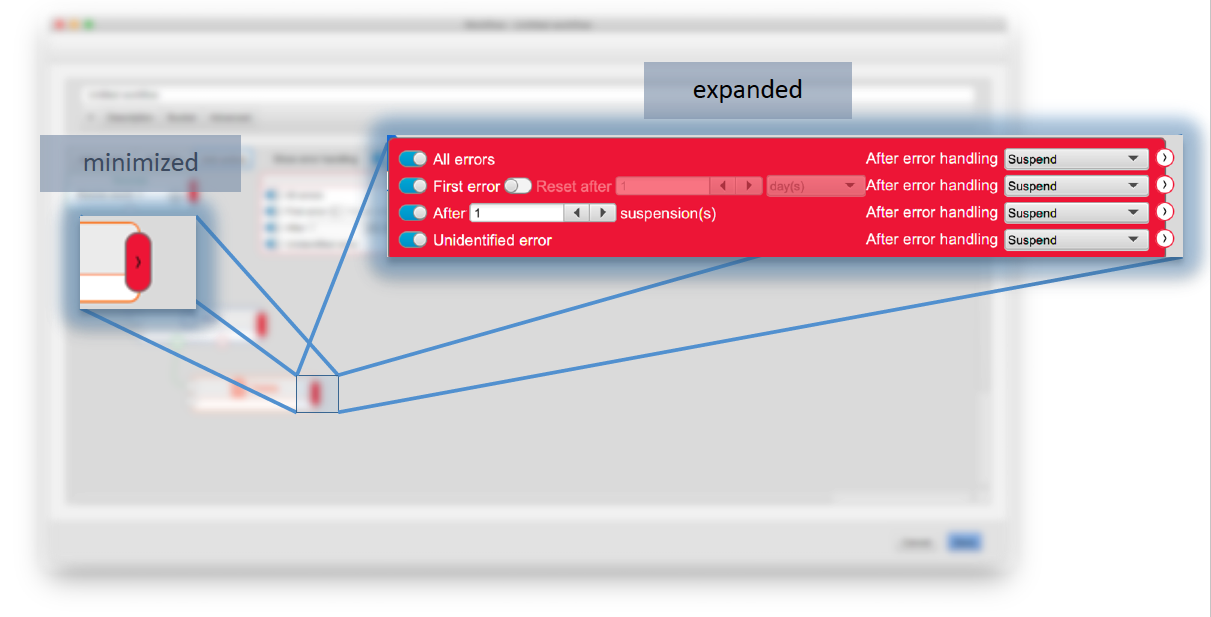
Minimized and expanded error container
Minimized and expanded error containerWorkflow common error handling
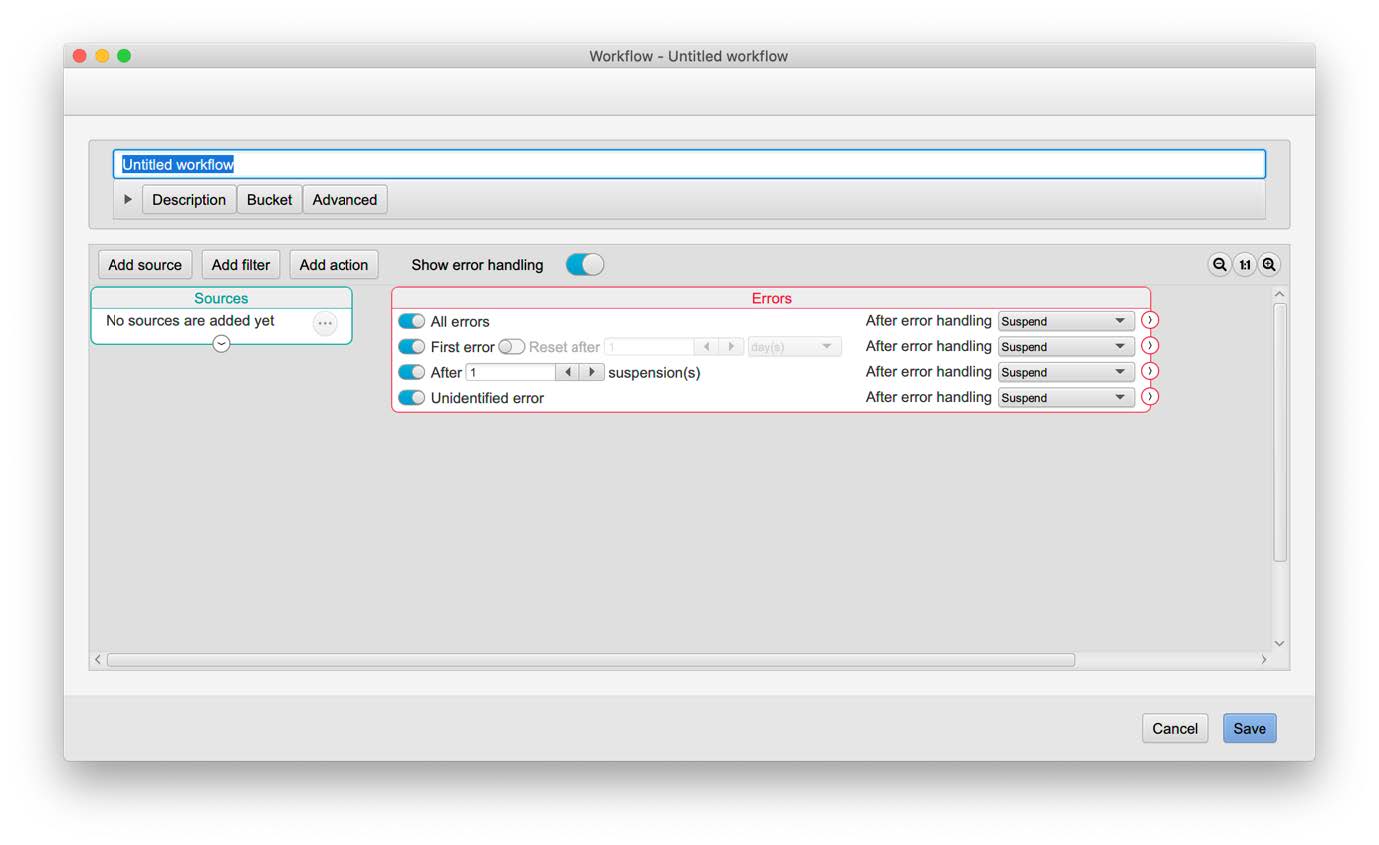
WWorkflow map with common error handling
Workflow map with common error handlingThe common error handling is automatically added to the workflow map at the top, next to
the source component. The error handling view contains four rows, see details below.

The common error handling view
The common error handling viewEach row is similar and has four main parts, numbered in Figure 5 above;
1. Activation toggle
2. Extra setup
3. Post action
4. Workflow connection
Activation toggle
When this toggle is selected, the error handler is active. If the toggle is turned off, the error
handler will not be invoked even if it has an error workflow connected. This enable a quick
temporary disabling of any error handling.
Extra setup
Some error types may have additional extra setup that will specify when the error will be
invoked.
Post action
This setting decides what will happen to the handling object after the error workflow has
been performed. The selections are:
• Suspend
• Continue handling
• Stop handling
Note that if multiple error handlers are invoked the post action will be Stop handling if any
error handler has this post action, otherwise suspend if any of the error handlers have this
post action. Note that the post action is active even if there is no workflow connection
attached to the error.
Workflow connection
This is the connector from which any error workflow is connected.
All errors
The all errors handler will be invoked for any error that occurs. This may be useful for
example if an email to an administrator should be sent whenever there is an error in the
workflow.
First error
The first error handler will be invoked for the first error that occurs in the workflow. There is
an option to reset after a given time. After a reset the first error will again cause the error
handling to be invoked.
After a number of suspensions
When an error occurs and the error handling is done, the handling item may be put in a
suspension state. After some time, the handling will resume from the same point where the
previous error occurred. If there is a new error, the handling item will again go into
suspension state.
This error handler will be invoked when a handling item has been in the specified number of
suspensions. This may be useful if the workflow should for example allow for an error to
occur but no more than a specific number of times.
Unidentified error
The unidentified error handler will be invoked when there has been an error that is not
handled by a specific error handler.
Individual component error handling
All components have the same set of error handling items as the general error handling.
Some components also have individual errors that are likely to happen.
Backup (action)
• Destination not found
The root destination does not exist
• Destination not accessible
The final destination is not writable
Cargo (action)
• Connection failed
Connection to the server did fail
Copy (action)
• Destination not found
The root destination does not exist
• Destination not accessible
The final destination is not writable
Database (action)
• Connection failed
Connection to the server did fail
Email (action)
• Connection failed
Connection to the server did fail
FTP (action)
• Connection failed
Connection to the server did fail
ImageMagick (action)
• Destination not found
The root destination does not exist
• Destination not accessible
The final destination is not writable
Move (action)
• Destination not found
The root destination does not exist
• Destination not accessible
The final destination is not writable
Extensis Portfolio (action)
• Connection failed
Connection to the server did fail
REST call (action)
• Connection failed
Connection to the server did fail
Text file (action)
• Destination not found
The root destination does not exist
• Destination not accessible
The final destination is not writable
Unzip (action)
• Destination not found
The root destination does not exist
• Destination not accessible
The final destination is not writable
ZIP (action)
• Source not found
One or more of the source files are not found
• Destination not found
The root destination does not exist
• Destination not accessible
The final destination is not writable
Error handling order
If there is any error workflow connected to the component where the error occurred, this
will be invoked first. When all the appropriate error workflows on the individual component
are finished, the workflow general error handlers are invoked.
The order of the error handlers are as follows;
1. The component’s unique error or
unidentified error
2. The component’s
first error
3. The component’s
after X numbers of suspension<7b>
4. The component’s all errors
5. The workflow general unique error or unidentified error
6. The workflow general first error
7. The workflow general after X numbers of suspension
8. The workflow general all errors


